Receipt
Steps to Receipt :
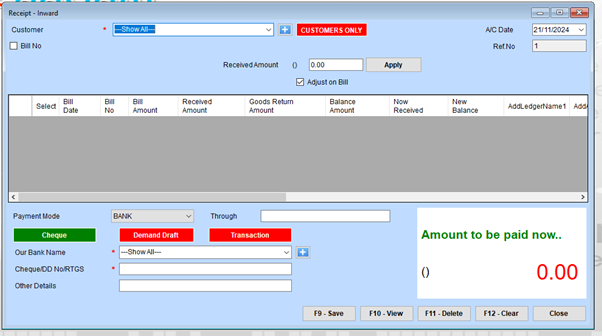
- Customer Selection
Step 1.1: Use the Customer dropdown to select the appropriate customer.
If the customer isn’t listed, click the ”+” button to add a new customer.
To view customer-specific invoices, enable the CUSTOMERS ONLY toggle.
Step 1.2: If the payment is linked to a specific bill, check the Bill No option and select the bill from the displayed list.
- Bill Details
After selecting the customer or bill:
The Bill Date, Bill No, Bill Amount, Received Amount, and other details will populate automatically.
If you’re receiving payment for multiple bills, select the desired ones using the Select checkbox.
- Payment Information
Step 3.1: Enter the Received Amount in the field next to “Received Amount.”
Click Apply to distribute the amount proportionally across the selected bills.
Step 3.2: If the payment is being adjusted to a specific bill, check the Adjust on Bill box.
- Payment Mode
Step 4.1: Choose the Payment Mode from the dropdown:
Options include BANK, CASH, CHEQUE, Demand Draft, or Transaction.
Step 4.2: Based on the selected payment mode:
For BANK or CHEQUE payments:
Choose the bank name from the dropdown (add a new bank using the ”+” button if necessary).
Enter the Cheque/DD/RTGS Number in the provided field.
For other modes, add any relevant transaction details.
Step 4.3: Fill in the Other Details field if additional payment information is required.
- Verify Payment Totals :
Check the Amount to be paid now section to ensure that the payment matches the entered values.
The system will calculate the remaining balance and update fields like Now Received and New Balance automatically.
- Action Buttons :
F9 - Save: Save the receipt entry.
F10 - View: View existing receipts or entries.
F11 - Delete: Delete the selected receipt entry.
F12 - Clear: Clear the form to create a new receipt entry.