User Permissions
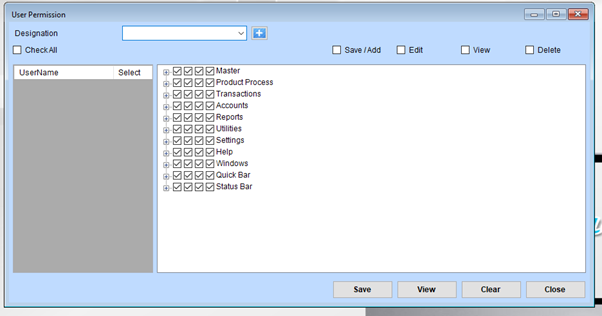
User Permissions Overview
1. Designation
- Field: Select or add a designation using the dropdown or ”+” button.
- Example: Manager, Accountant, Salesperson.
2. Check All
- Option: Checking this box grants the user access to all permissions for all categories listed below.
- Useful for administrators or superusers who need full system access.
3. Permissions by Category
Permissions are grouped into specific functional areas:
- Master: Core configurations like products, users, and settings.
- Product Process: Permissions related to manufacturing or inventory processes.
- Transactions: Access to sales, purchases, and financial transactions.
- Accounts: Control over accounting modules and ledgers.
- Reports: Access to generate or view reports.
- Utilities: System utilities and maintenance tools.
- Settings: Configuration options.
- Help: Access to support or documentation sections.
- Windows: UI-specific configurations.
- Quick Bar: Access to shortcut features.
- Status Bar: Control over viewing system statuses.
4. Permission Types
- Save/Add: Grants rights to create or add new entries.
- Edit: Allows modifications to existing data.
- View: Restricts access to read-only mode.
- Delete: Enables the deletion of entries in the selected categories.
5. User Selection
- User List: Displays a list of usernames. Select a user to apply specific permissions.
- If no username is shown, ensure users are already created in the system.