Select the Bill Type
Choose the Bill Type based on how the transaction will be processed:
- Cash: For immediate payment transactions.
- Credit: For transactions where payment is deferred.
Select Customer Name
Choose the customer name from the available list or enter the details manually if necessary.
Select Products to be Sold
Choose the products to be sold from the inventory. You can select multiple products depending on the order.
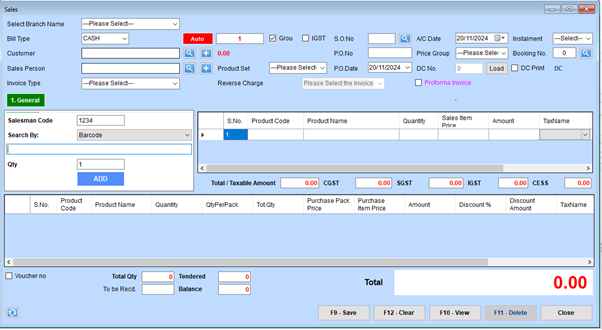
Sales Transaction Steps
Step 1: Select Branch and Bill Type
- Select Branch Name:
- Use the dropdown to choose the branch where the sales transaction is being recorded.
- Choose Bill Type:
- Select the type of bill (e.g., “CASH” or another option) from the dropdown.
Step 2: Enter Customer and Sales Details
-
Customer Information:
- Fill in the Customer field or search for an existing customer using the magnifying glass icon.
-
Salesperson:
- Enter the Salesman Code or select the salesperson from the list.
-
Invoice Type:
- Select the appropriate Invoice Type for this transaction.
Step 3: Add Product Information
- Search for Product:
- Use the Search By field (e.g., Barcode) to locate the product.
- Enter Quantity:
- Input the desired quantity in the Qty field.
- Click Add:
- Press the ADD button to add the product to the table.
Step 4: Verify Product and Tax Details
-
Review Product Table:
- Check the Product Code, Product Name, Quantity, Sales Item Price, and Amount columns to ensure accuracy.
-
Tax Details:
- Verify the tax components (e.g., CGST, SGST, IGST, and CESS) under the Total/Taxable Amount section.
Step 5: Apply Discounts and Adjustments
-
Discounts:
- Enter the Discount % or Discount Amount for individual items or the total amount as applicable.
-
Final Adjustments:
- Verify totals and adjust for any rounding off or other additional charges.
Step 6: Review and Save
-
Totals:
- Confirm the Total Qty, Balance, and Total amounts displayed at the bottom.
-
Save Transaction:
- Press the F9 - Save button to save the details.
-
Clear or Edit:
- Use F12 - Clear to reset or F11 - Delete to remove specific entries.
Step 7: Finalize or Print
-
If required, generate a Proforma Invoice or proceed with the billing.
-
Preview and Save:
- To ensure accuracy, use the Preview option to view the sales bill before saving it. Once everything is correct, save the bill details for record-keeping and future reference.