Customer Master :
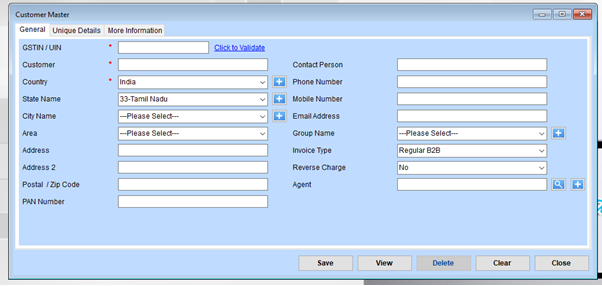
Fill Mandatory Fields
- GSTIN / UIN: Enter the customer’s GST Identification Number or UIN and click Click to Validate to ensure accuracy.
- Customer Name: Provide the name of the customer.
- Country: Select the customer’s country from the dropdown. Use the + button to add new countries if needed.
Select Address Details
- State Name: Choose the state from the dropdown.
- City Name: Select the city. Use the + button to add new cities.
- Area: Choose the area. Use the + button to add additional areas.
- Address & Postal Code: Enter the full address, including an optional second address line and postal/ZIP code.
- PAN Number: Enter the customer’s PAN if applicable.
Provide Contact Details
- Contact Person: Input the name of the primary contact person.
- Phone Number and Mobile Number: Provide the respective contact numbers.
- Email Address: Enter the customer’s email address for communication.
Select Additional Information
- Group Name: Assign the customer to a group for better categorization. Use the + button to add new groups if necessary.
- Invoice Type: Select the appropriate invoice type (e.g., Regular B2B).
- Reverse Charge: Choose Yes or No based on whether reverse charge is applicable.
- Agent: Link the customer to an agent if required, using the search button or + button to add new agents.
Save, View, Manage
- Save: Click to save the entered details.
- View: Use this option to view all saved customer records.
- Delete: Remove an existing customer record if no longer needed.
- Clear: Reset all fields to their default state.
- Close: Exit the window after completing your task.
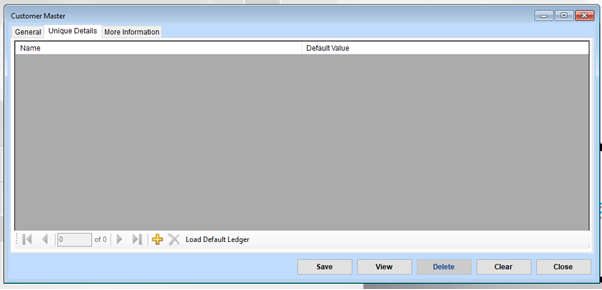
Understanding the Tabs
The form is divided into tabs for better organization of information.
- General: Likely contains basic customer information (e.g., Name, Address, Contact Details).
- Unique Details: May have customer-specific identifiers or additional attributes.
- More Information: Could include advanced or optional details like notes or custom fields.
Adding a New Customer
Navigate through the tabs and fill in the required fields:
- In the Name column, enter the customer’s name.
- Add values in the “Default Value” column if needed.
- If there are dropdowns or fields requiring predefined values, ensure correct selections are made.
Saving the Data
Once all fields are filled, click the Save button to store the customer information.
Viewing Existing Records
Click the View button to see a list of all previously saved customers.
Use navigation buttons (arrows) to scroll through records.
Editing or Updating
Select the record you want to edit using the navigation or view list.
Make the necessary changes and click Save.
Deleting a Record
Highlight the record to delete and click the Delete button.
Confirm the deletion if prompted.
Clearing the Form
To reset the form without saving, click the Clear button.
Closing the Form
Click the Close button to exit the interface.
Loading a Default Ledger (if applicable)
Click the Load Default Ledger button to pre-fill some values based on pre-configured settings.
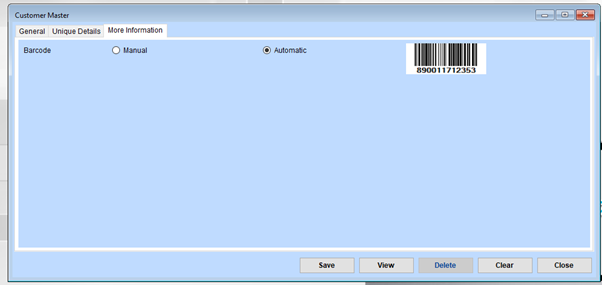
Select Barcode Option
Choose Manual if you wish to input a specific barcode.
A text box might appear to enter the desired barcode.
Choose Automatic to allow the system to generate a barcode for you.
View or Confirm Barcode
If automatic generation is chosen, review the generated barcode (both number and visual representation).
Use the barcode as required (e.g., for scanning or printing).
Save the Details
After selecting or entering the barcode, click the Save button to ensure the barcode is stored with the customer record.
Modify or Update
If changes are needed, navigate back to this tab, update the barcode selection, and save the updated information.
Delete or Clear
- Delete: Use the Delete button to remove the entire customer record, including the barcode.
- Clear: Use the Clear button to reset fields within this tab without saving changes.
Exit
Once the required actions are completed, click the Close button to exit the form.