Purchase Master
The Purchase Master section helps record different types of purchases, such as inventory or asset-based purchases.
Steps to Record a Purchase
1. Select Purchase Master
From the Master Menu, navigate to Purchase Master.
2. Choose the Type of Purchase
-
Inventory: For stock-related purchases, which will be added to your inventory and tracked as part of your goods.
-
Asset: For non-stock purchases such as office furniture, equipment, or machinery. These purchases are categorized separately as assets.
3. Enter Purchase Details
Depending on the purchase type (inventory or asset), fill in the necessary details:
- Supplier Name
- Product Name
- Quantity
- Price per unit
- Tax Details (if applicable)
- Date of Purchase
4. Save the Purchase Record
After filling in the details based on your requirements, click Save to record the purchase transaction.
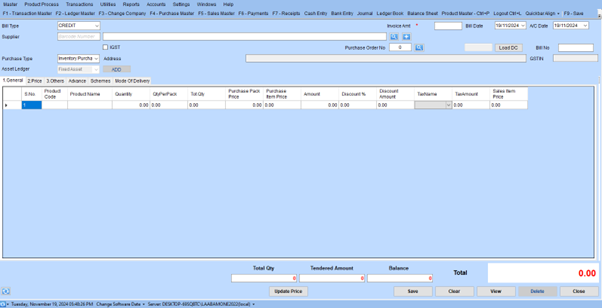
Detailed Workflow for Recording Purchases
Top Section: Basic Information
-
Bill Type: Select the type of bill (e.g., CREDIT).
-
Supplier:
- Enter the barcode number or search for the supplier using the search icon.
- If the supplier is registered under GST, check the IGST box if applicable.
-
Purchase Type:
- Choose Inventory Purchase for stock items or Asset Purchase for non-stock purchases.
-
Asset Ledger: If recording an asset, assign the appropriate Fixed Asset category.
-
Address: Optionally input the supplier’s address.
Purchase Order and Invoice Details
-
Purchase Order No: Input or search for the associated purchase order.
-
Invoice Amount: Specify the total invoice value.
-
Bill Date & A/C Date: Select the respective dates.
Main Grid: Product Details
Add product details row by row:
- S.No.: Auto-generated serial number.
- Product Code and Product Name: Identify the product being purchased.
- Quantity and Qty Per Pack: Enter the quantity in total and per pack, if applicable.
Price Details
- Purchase Pack Price: Price per pack.
- Purchase Item Price: Price per individual item.
Discount and Tax Details
- Discount % and Amount: Specify applicable discounts.
- Tax Name and Amount: Choose the tax type and enter the corresponding value.
Tabs for Additional Information
- General, Price, Others, Advance, Schemes, Mode of Delivery: Input extra details specific to the purchase transaction.
Step 1: Access the Price Tab
Click on the “2. Price” tab at the top of the grid section.
Step 2: Enter Pricing Details
-
Purchase Pack Price: Enter the price of the product per pack (if the product is sold in packs).
-
Purchase Item Price: Specify the price per individual item within the pack.
Discount:
Add any applicable discounts:
- Discount %: Enter the percentage of the discount, if available.
- Discount Amount: Input the actual discount value.
Tax Details:
- Select the tax type (e.g., GST, IGST).
- Enter the tax amount based on the taxable value.
Additional Costs:
- If applicable, specify any extra charges like Freight or Handling Costs.
Step 3: Review Calculations
Verify that the system correctly calculates the Net Amount by applying the entered prices, discounts, and taxes.
Step 4: Save Changes
Once all pricing details are entered, click the Save button at the bottom of the form to store the pricing information.
Access the “Others” Tab
Click on the “3. Others” tab at the top section of the grid.
Fill in Additional Information
-
Agent:
- Enter the agent’s name or select from a predefined list (if applicable).
- Use the search icon to look up existing agents.
-
Vehicle Registration Number (Vehicle RegNo):
- Input the vehicle’s registration number used for transporting the goods.
- Use the search icon to find and select previously registered vehicles.
-
Driver Name:
- Specify the name of the driver responsible for transporting the goods.
- Use the search icon to select an existing driver from the records.
-
Description:
- Enter a brief description or remarks regarding the transaction, transportation, or other relevant details.
-
Dropdown Menu (if applicable):
- Choose an option from the dropdown for additional categorization or settings (if visible).
Review and Save
Double-check the entries for accuracy. Click Save to store the details for the “Others” tab.
Advance Tab
The “Advance” section highlights prepayments:
- Prepaid Amounts: Specify if advance payments were made.
- Adjustments: Ensure the advance payment is deducted from the total payable.
Schemes Tab
In this tab, the user can:
- Apply predefined schemes linked to the purchase.
- Review the total points or discounts offered through specific schemes.
Mode of Delivery Tab
Details related to the transportation and delivery of goods:
- Delivery Method: Options include “Customer,” “Employee,” or “Transport.”
Transport Details:
- Transport Name
- LR Date and LR Number (if applicable).
Payment Mode:
Indicate if the delivery is “Paid” or “To Pay.”
Number of Cases:
Specify the total cases delivered and the cost incurred.
Bottom Section: Finalizing the Transaction
- Totals: Verify totals for quantity, tendered amount, and balance.
- Update Price: Use this button if any adjustments are needed.
Action Buttons:
- Save: Save the transaction.
- Clear: Reset all fields.
- View: Review saved transactions.
- Delete: Remove the current record if needed.
- Close: Exit the form.