Purchase Returns
Sometimes, due to product defects or other issues, you may need to return purchased goods. The Purchase Returns section enables you to initiate this process.
Steps to Process a Purchase Return
1. Select Bill Type
First, select the Bill Type for the return transaction, typically Purchase Return.
2. Choose Customer Name
Even though this is a return from the supplier, you still need to choose the customer name (if applicable) associated with the transaction.
3. Select the Product to Return
After choosing the customer, select the product that is being returned. You can choose from the list of products in the purchase records.
4. Enter Bill Number
To track the return, enter the Bill Number of the original purchase that is being returned.
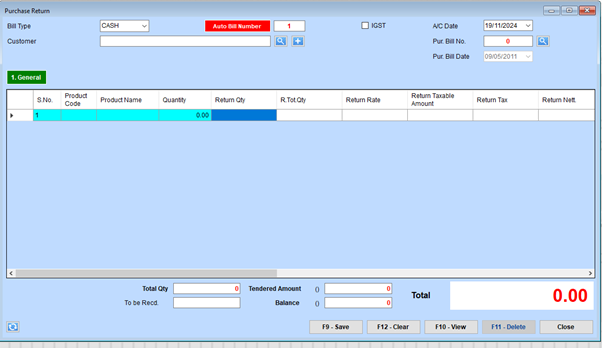
Step-by-Step Instructions for Purchase Return
1. Select the Bill Type
Use the dropdown menu next to “Bill Type” to choose the appropriate type (e.g., CASH or CREDIT).
2. Set the Auto Bill Number
The “Auto Bill Number” field will automatically generate a number. Ensure it’s correct, or edit if required.
3. Enter Customer Details
Enter the customer’s name in the “Customer” field.
- If there’s a search button (magnifying glass icon), you can use it to find the customer from a list.
4. Fill Product Details
In the grid area:
- Enter the Product Code or Product Name.
- Specify the Quantity being returned under the “Return Qty” column.
5. Review Rates and Taxes
The system may auto-fill fields such as Return Rate, Return Taxable Amount, and Return Tax. Verify these amounts.
6. Select Purchase Bill Details
Use the “Pur. Bill No.” field to input or search for the original purchase bill.
- Confirm the “Pur. Bill Date” matches the original transaction.
7. IGST Checkbox
Tick the “IGST” checkbox if integrated GST is applicable.
8. Review Totals
Verify the “Total Qty” and ensure the amounts under To Be Recd, Tendered Amount, and Balance are accurate.
9. Save the Transaction
Once all details are entered and verified, press F9 - Save to save the purchase return entry.
10. Additional Actions
- Use F12 - Clear if you need to reset the form.
- Use F10 - View to preview or review the entry before saving.
- Use F11 - Delete if you need to delete a specific entry.
11. Close the Form
Once completed, click the “Close” button to exit the form.