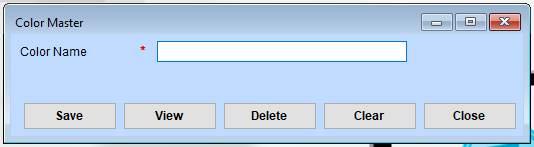
Color Master
Steps for Managing Colors
1. Add a New Color
Enter the Color Name:
- Type the desired color name in the input field next to “Color Name.”
- The red asterisk (*) indicates this is a required field.
Save the Color:
- After entering the color name, click the “Save” button to store the color in the database.
2. View Existing Colors
Click “View”:
- Click the “View” button to see a list of all saved colors. The stored colors will likely appear in a new window or list.
3. Delete a Color
Select a Color to Delete:
- Use the “View” option to find the color you want to delete.
Delete the Color:
- After selecting the color (if applicable), click the “Delete” button to remove it from the database.
4. Clear the Input Field
Click “Clear”:
- If you want to reset the input field to enter a new color, click the “Clear” button.
5. Close the Window
Click “Close”:
- To exit the interface, click the “Close” button.