Setting Up the Company Master in ERP LaabamOne
Step 1: Access the Company Master Page
Log in to your ERP system.
Navigate to the Company Master Page, the central location for entering and managing your company’s details.
Step 2: Enter Required Details
On the Company Master Page, fill in the following essential fields:
- Company Name: Enter the official name of your business.
- Address: Provide the complete business address.
- Tax Details: Input necessary tax information (e.g., GST, VAT, etc.).
- Additional Information: Include any other required details specific to your business.
Step 3: Save Company Information
Once all fields are completed, click Save to securely store the information in the system.
The system allows you to create and manage multiple companies, enabling seamless oversight of various business entities from a unified dashboard.
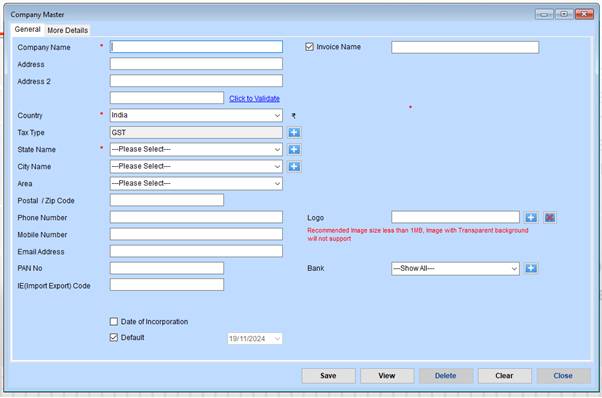
Steps to Fill the Company Master Form
1. General Information
- Company Name: Enter the name of your company. (Mandatory field)
- Invoice Name: Specify the name that will appear on invoices.
2. Address Details
- Address: Provide the primary address of your company.
- Address 2: Optionally, add additional address details if necessary.
3. Country and Region
5
- Country: Select the country from the dropdown menu.
- Tax Type: Choose the applicable tax type (e.g., GST).
- State Name: Select the state where your company is located.
- City Name: Select the city.
- Area: Choose the specific area within the city.
4. Contact Details
- Postal/Zip Code: Enter the postal or ZIP code of your company’s location.
- Phone Number: Provide the company’s landline number, if available.
- Mobile Number: Enter the contact mobile number.
- Email Address: Provide the official email address for communication.
5. Identification Details
- PAN No: Input your company’s Permanent Account Number (PAN).
- IE (Import Export) Code: If applicable, enter the Import Export Code.
6. Logo
Upload your company logo by clicking the logo field.
Ensure the image size is less than 1MB.
Transparent background images are not supported.
7. Bank Details
- Bank: Select the associated bank account from the dropdown or add a new one using the + button.
8. Additional Options
- Date of Incorporation: Optionally, input the date your company was incorporated.
- Default: Check this box if this company is your default entity.
9. Save the Information
Once all the fields are completed, click Save to store the company details.
10. Review or Edit
- View: Click View to review the entered details.
- Use Delete, Clear, or Close as needed for managing entries.