Agent Master :
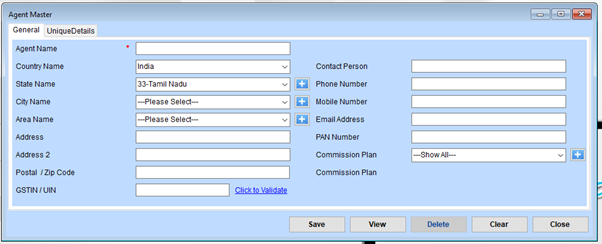
Step 1: Open the “Agent Master” Form
Ensure the form is displayed on your system.
Step 2: Fill in the Agent’s Name
Enter the name of the agent in the “Agent Name” field. This is marked with an asterisk (*), meaning it is a mandatory field.
Step 3: Select the Country Name
From the dropdown menu, select the country. In this case, “India” is selected by default.
Step 4: Select the State Name
Use the dropdown to choose the appropriate state. For example:
Select “33-Tamil Nadu” if applicable.
If the required state is not listed, use the plus (+) button beside the dropdown to add a new state.
Step 5: Select the City Name
From the dropdown, choose the city.
If the city is missing, use the plus (+) button to add a new city.
Step 6: Select the Area Name
Choose the area name from the dropdown.
Use the plus (+) button to add a new area if necessary.
Step 7: Enter the Address Details
Address: Enter the primary address.
Address 2: Optionally, provide additional address information.
Step 8: Fill in the Postal/Zip Code
Input the postal code for the agent’s location.
Step 9: Enter the GSTIN/UIN (if applicable)
Input the GSTIN/UIN number.
Click on “Click to Validate” to verify the GSTIN.
Step 10: Add Contact Information
Contact Person: Enter the name of the contact person.
Phone Number: Provide a landline number.
Mobile Number: Enter a mobile phone number.
Email Address: Provide a valid email address.
Step 11: Enter the PAN Number
Input the PAN (Permanent Account Number) of the agent.
Step 12: Set the Commission Plan
From the dropdown, select the applicable commission plan.
Use the plus (+) button if a new commission plan needs to be added.
Step 13: Save the Information
After filling in all the fields, click on Save to store the details.
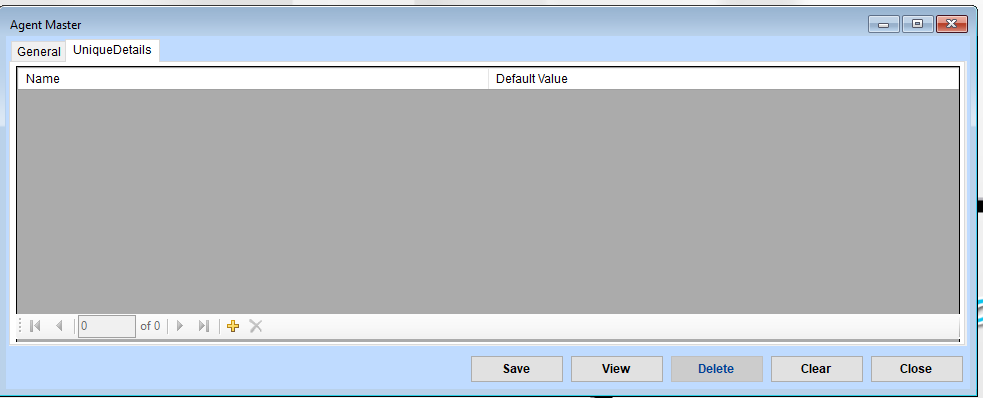
1. Add Agent Details
Add New Agent:
Click the ”+” (Add) button at the bottom of the grid to add a new agent entry.
A new row will appear in the grid. Fill in the agent’s details under the Name and Default Value columns.
2. Save Agent Information
After entering the required details, click the “Save” button at the bottom of the form to save the information.
Ensure all fields are filled in correctly before saving.
3. View Existing Agents
Click the “View” button to see the list of agents stored in the system.
4. Delete an Agent
To remove an agent:
Select the row of the agent you want to delete in the grid.
Click the “Delete” button to remove the selected agent.
Confirm the deletion if a pop-up dialog appears.