Setting the Financial Year in ERP LaabamOne
Step 1: Access the Financial Year Page
Once the company details are saved, the Financial Year Page will open automatically.
This page is where you configure the financial year settings for your company.
Step 2: Enter Financial Year Details
- Start Date: Enter the beginning date of the financial year (e.g., April 1, YYYY).
- End Date: Specify the ending date of the financial year (e.g., March 31, YYYY).
- Other Settings: Configure any additional financial year-specific requirements as per your company’s policies.
Step 3: Save the Financial Year Information
After entering all the required details, click Save to finalize the financial year setup.
Steps to Configure the Fiscal Year
1. Access the Fiscal Year Page
Navigate to the Fiscal Year Page after saving the company details. It will open automatically, or you can access it from the settings menu if needed.
2. Input Fiscal Year Details
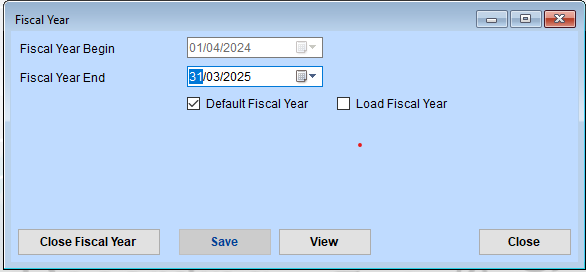
- Fiscal Year Begin: Use the dropdown or calendar icon to select the starting date of the fiscal year (e.g., 01/04/2024 for an April start).
- Fiscal Year End: Select the ending date for the fiscal year (e.g., 31/03/2025 for a March end).
3. Choose the Default Fiscal Year
- Default Fiscal Year: Check this box to set the selected fiscal year as the default.
- Load Fiscal Year: Optionally check this box if you want to load the fiscal year settings into the system immediately.
4. Save the Fiscal Year
Click the Save button to finalize and store the fiscal year settings.
5. Additional Actions
- Close Fiscal Year: Use this option when the fiscal year ends to archive or finalize the accounts for the selected period.
- View: Click this button to review the current fiscal year settings.
- Close: Exit the Fiscal Year page without saving changes.