Sales Return
The Sales Return section allows you to handle product returns from customers.
Steps to Process a Sales Return
1. Select the Bill Type
Choose the Bill Type for the return transaction, typically Sales Return.
2. Customer Name
Enter the customer name from whom the product is being returned.
3. Enter Salesperson’s Name
Specify the salesperson’s name responsible for the transaction. This is important for tracking and accountability.
4. Select the Product to Return
Choose the product that is being returned from the list of products sold.
5. Enter the Bill Number
For accurate tracking, enter the bill number associated with the original sales transaction.
6. Save the Sales Return
Once all the details are entered, save the sales return to update the inventory and customer records.
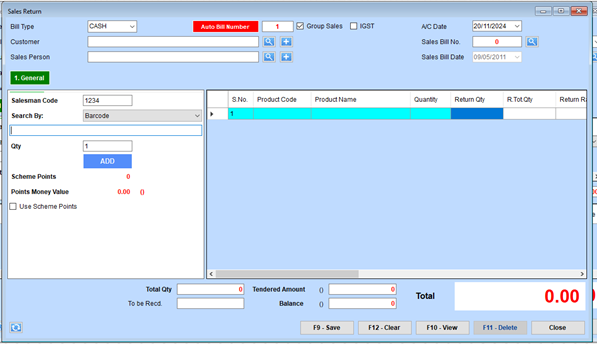
Sales Return Transaction Steps
Step 1: Select Bill Type and Enter Basic Details
- Bill Type:
- Choose the type of bill (e.g., CASH) from the dropdown.
- Auto Bill Number:
- Ensure the system-generated Auto Bill Number is correct, or modify it if needed.
- Customer Details:
- Enter the customer information using the search field (magnifying glass icon) next to Customer.
- Sales Person:
- Input or select the salesperson’s code if applicable.
Step 2: Add Product and Return Details
- Search for Product:
- Use the Search By field (e.g., Barcode) to locate the product being returned.
- Enter Quantity:
- Specify the Qty of the product being returned in the field provided.
- Return Quantity:
- In the table, update the Return Qty column with the exact quantity of the item being returned.
- Click Add:
- Press the ADD button to add the item to the product table.
Step 3: Verify Return Details
- Review Product Information:
- Check the table for accurate details, including:
- Product Code
- Product Name
- Quantity
- Return Qty
- Return Rate
- Check the table for accurate details, including:
- Adjust Return Totals:
- Ensure the R. Tot. Qty and total amounts are updated correctly.
Step 4: Use Scheme Points (if applicable)
- Check Scheme Points:
- Review the Scheme Points and Points Money Value displayed.
- Apply Points:
- If the customer wishes to redeem points, tick the Use Scheme Points checkbox.
Step 5: Review Totals and Balance
- Verify Totals:
- Confirm the values for:
- Total Qty
- Tendered Amount
- Balance
- Total (at the bottom-right corner).
- Confirm the values for:
- Make Adjustments:
- Add any additional comments or adjustments as needed.
Step 6: Save or Clear the Transaction
- Save the Return:
- Use the F9 - Save button to finalize and save the return transaction.
- Clear or Delete:
- Use F12 - Clear to reset the form or F11 - Delete to remove specific entries.