Transaction Master :
1. Adding a New Transaction
Access the Transaction Master Module
Open the Transaction Master module.
Fill in the Transaction Details
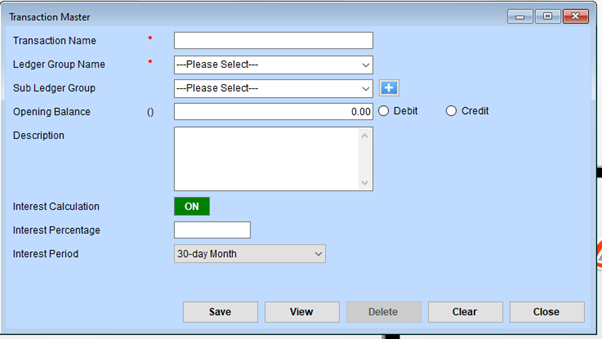
- Transaction Name: Enter a unique name for the transaction (e.g., Rent Payment, Utility Bills).
- Ledger Group Name: Select the appropriate ledger group from the dropdown menu (e.g., Expenses, Income, Assets).
- Sub Ledger Group: Choose the relevant sub-ledger group.
If the required sub-ledger is not listed, click the + button to add a new one. - Opening Balance: Input the opening balance for the transaction.
Specify whether it is a Debit or Credit balance by selecting the corresponding radio button. - Description: Provide a brief description of the transaction (e.g., “Monthly office rent for December 2024”).
Enable or Disable Interest Calculation
- Interest Calculation: Toggle this option to ON or OFF depending on whether interest applies to this transaction.
- Interest Percentage: If interest calculation is enabled, specify the applicable interest rate (e.g., 5%).
- Interest Period: Select the interest calculation period from the dropdown (e.g., 30-day Month, Calendar Month).
Save the Transaction
Click the Save button to save the transaction record.
A confirmation message will appear upon successful saving.
2. Viewing Existing Transactions
Click on the View Button
Use the View button to display a list of all saved transactions.
Search or Filter Transactions
Locate a specific transaction using filters such as Transaction Name, Ledger Group, or Date.
Open a Transaction Record
Select a record from the list to view its detailed information.
3. Editing a Transaction
Locate the Transaction
Use the View feature to search for the transaction you want to edit.
Update Fields
Modify the fields as necessary, such as the Transaction Name, Opening Balance, or Interest Calculation settings.
Save Changes
Click the Save button to apply the updates.
Ensure all mandatory fields are completed before saving.
4. Deleting a Transaction
Find the Transaction to Delete
Use the View button to locate the transaction.
Delete the Record
Select the transaction and click the Delete button.
Confirm the deletion in the prompt that appears.
Deletion is permanent, so ensure the transaction is no longer needed.
5. Clearing Input Fields
Reset the Form
If you need to start over while entering details, click the Clear button to reset all input fields.
6. Closing the Module
Exit the Transaction Master
Click the Close button to return to the previous screen or the main menu.